Castor Documentation
Hello & Welcome! Thank you for purchasing!
If you have any questions, feel free to contact us at support@gtcreators.com
Created: 25/03/2019
Introduction
Requirements
- PHP 5.3 or higher
- MySQL 5.0 or higher
- GD Library
- Self-Hosted WordPress 4.x
Support
Recommend
We recommend the plugins listed below to provide fully functionalities in use:
- Castor Core
- WPBakery Visual Composer
- Revolution Slider
Theme Installation
Once you've downloaded the installation file on ThemeForest, extract it and locate a file called castor.zip. You can install the theme by using one of two installation methods:
Install by WordPress Theme Manager
This is probably the simplest way for most users. Here are 6 steps you need to take:
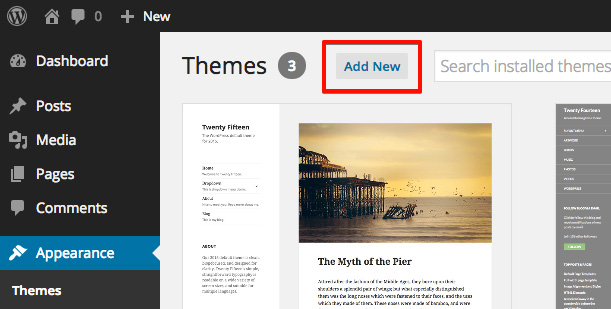
- Login to your Admin page.
- Navigate to Appearance > Themes.
-
Click Add New
-
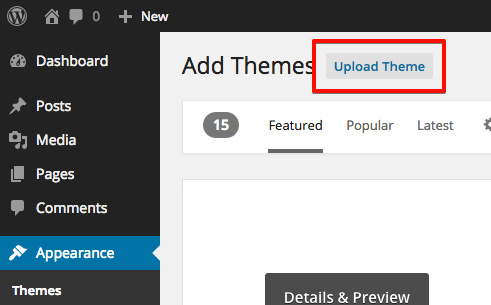
Then click Upload Theme
-
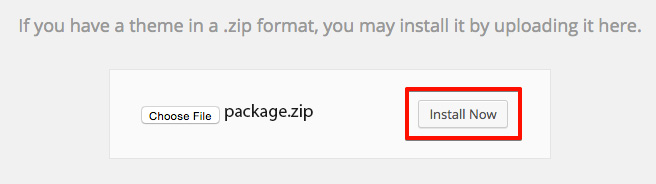
Next, browse to the zip file and click Install now so the theme can be uploaded and installed.
-
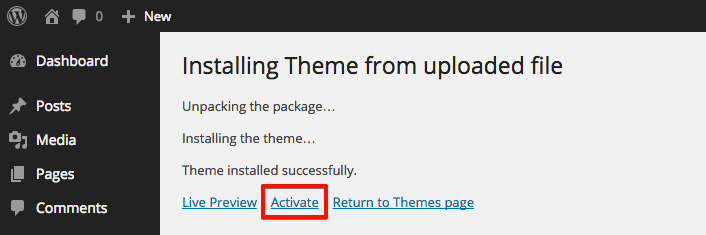
After done installing, click Activate to publish the theme
Install through FTP upload
If you want to install via FTP, here are 3 steps you need to take:
- Using FTP client, login to the server where your WordPress website is hosted
- Using FTP client, navigate to the /wp-content/themes/ directory under your WordPress website's root directory
- Using FTP client, upload the castor directory to themes directory on remote server
Once installation is complete, your Castor theme will be ready to use.
Visit ThemeForest Knowledgebase to know Common WordPress Installation Issues may help you figure out your install problem.
If you plan to change template code, after installing Castor main theme, you should install and active Castor child theme.
This action will protect your customized code whenever Main theme is updated.
Install Plugins
We recommend you to install the following plugins to provide more functionalities in use:
- Castor Core
- WPBakery Visual Composer
- Revolution Slider
After activating the theme, you will be asked to installed the recommended plugins, you can proceed by clicking on Begin installing plugins
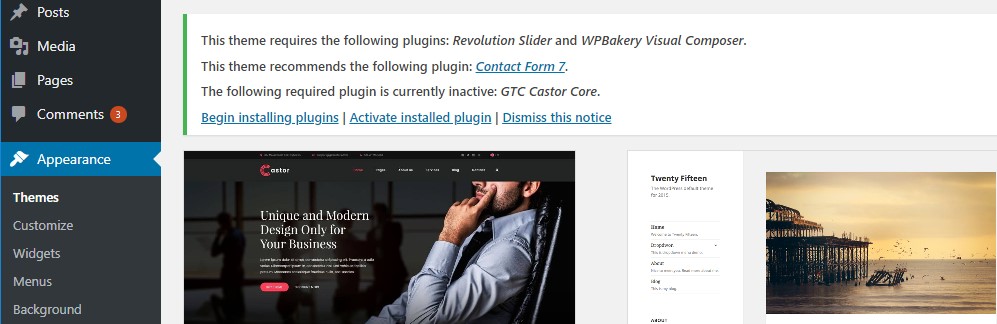
In the next page, check all the plugins that you want to install then on the drop down Bulk Actions, choose Install then click Apply, the plugin installation process will start.
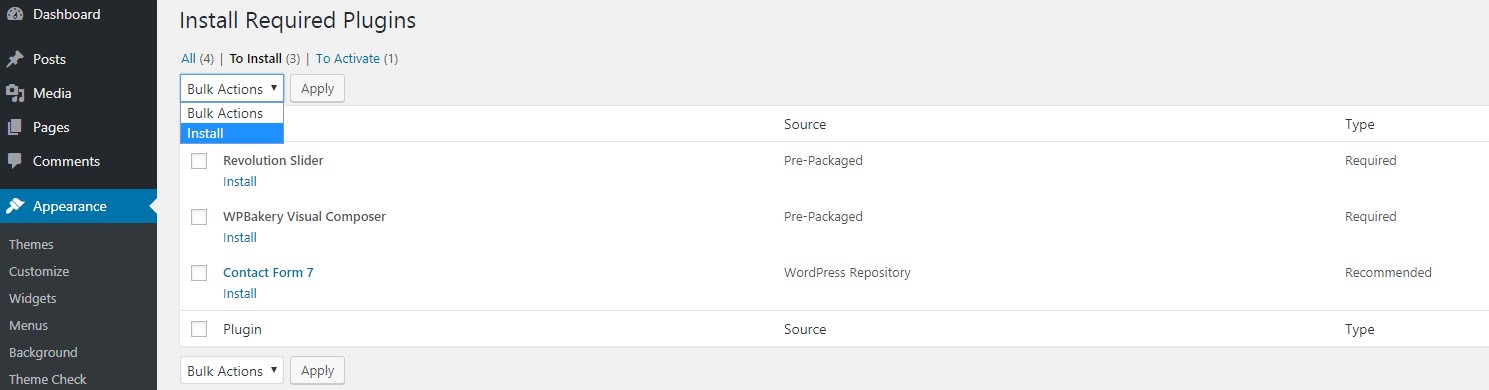
After install plugins, go to Appearance > Install Plugins, check all the plugins that you want to activate then on the drop down Bulk Actions, choose Activate and click Apply, the plugin activation process will start. Wait for all the plugin activated then you can start customizing your website as you want
Importing Demo Content
With the Castor theme, you have the option to either start creating your site from scratch, or choosing to import one of the included demo sites to use as a starting point, and then modifying it to suit your needs. In this section we will explain how to do the latter.
Castor comes with a one-click import module. To import one of the included demo sites, please follow these steps:
- Login to your WordPress admin panel
-
Navigate to Theme Options > Demo Importer

-
From the Import menu, choose the demo site that you would like to import
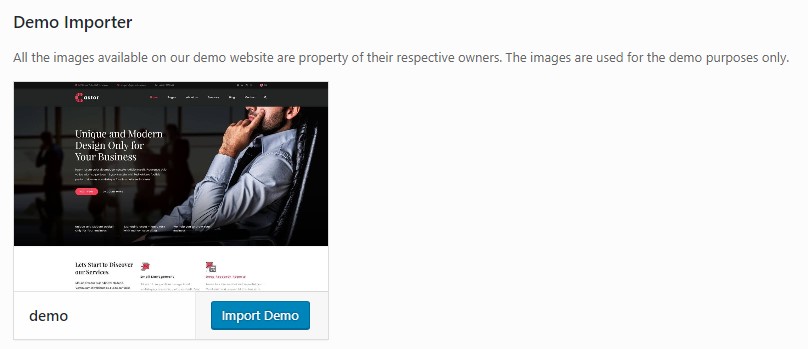
- Click on the Import Demo button and wait for the import process to finish.
Please note that the images we use on our demo sites are copyrighted, and if you'd like to publish them on your site, you would need to purchase them separately.
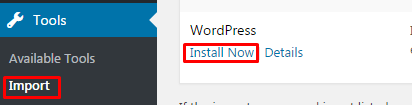
Importing Demo Content by WordPress Importer
This is another way to import theme demo content
- Login to your WordPress admin panel
-
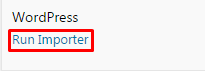
Navigate to Tools > Import
-
Click button "Run Importer"
-
In Castor package folder find demo xml folder than choose the demo site that you would like to import and select content.xml
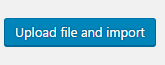
-
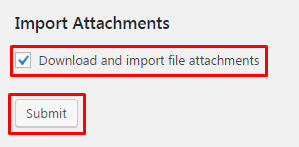
For Download and import file attachments click to checkbox. Click on the Submit button and wait for the import process to finish.
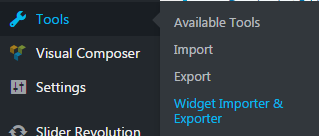
For importing widget install Widget Importer & Exporter plugin
-
Navigate to Tools > Widget Importer & Exporter
-
In Castor package folder find demo xml folder than choose the demo site that you would like to import and select widgets.wie
- For Download and import widgets click on the Import Widgets button and wait for the import process to finish.
For reset database you can use Database Reset plugin.
Updating Theme
You can update your theme by performing the following steps:
- Login to your WordPress admin panel
- Download the latest theme .zip file from ThemeForest
- Extract it and locate castor.zip
- Extract castor.zip and locate the castor folder
- Copy/Replace the contents of the castor folder to the /wp-content/themes/castor folder of your web site.
Theme Customization
To start customizing Castor theme, in the Admin page please go to Theme Options
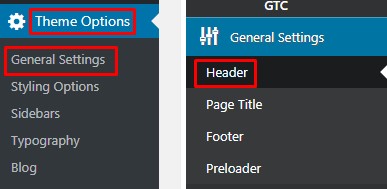
General Settings
-
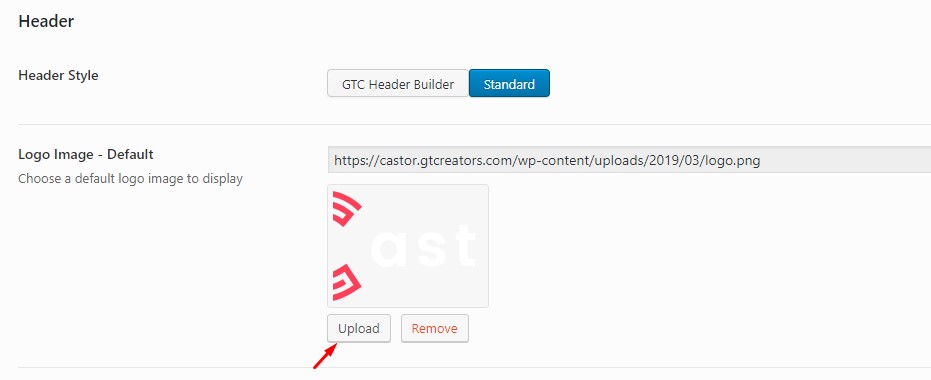
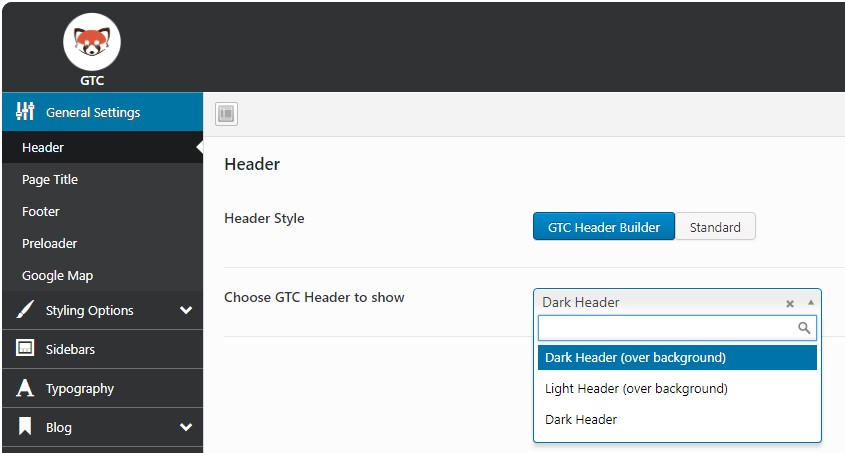
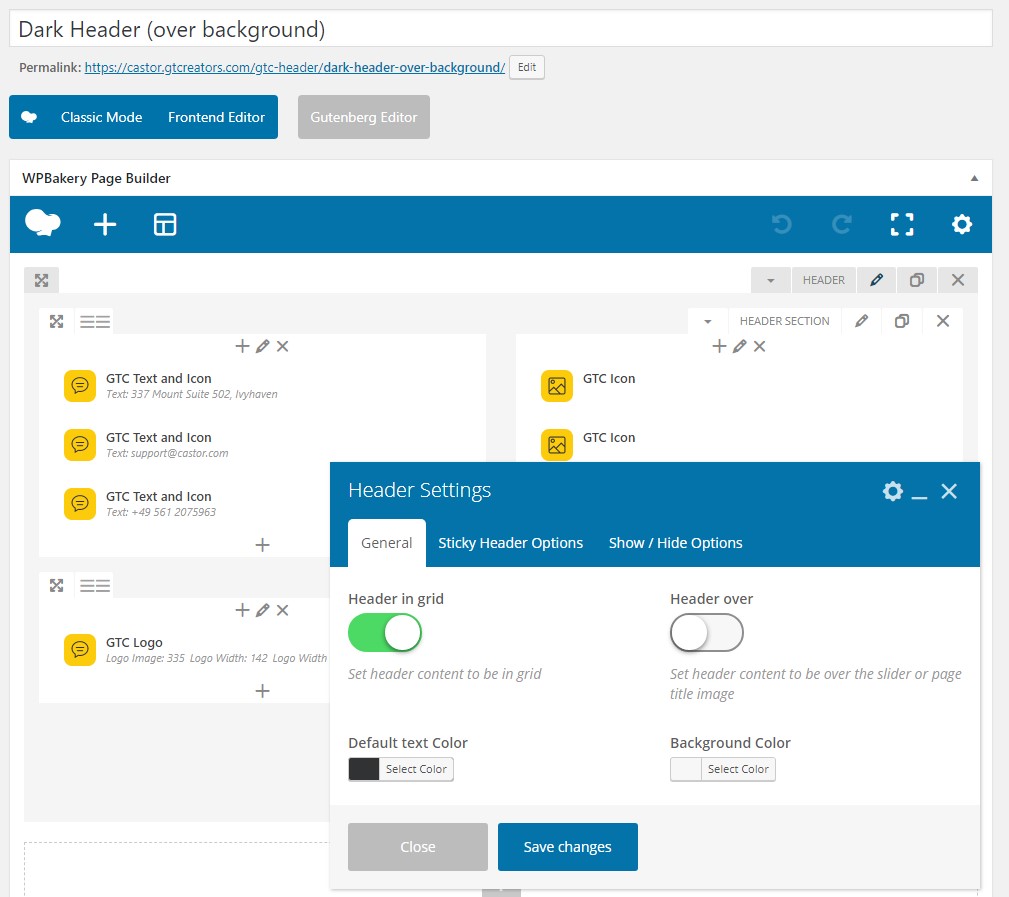
Header
To add your logo to the header, navigate to Theme Options > General Settings > Header > Logo Image - Default from your WordPress admin panel and click the upload button next to the Logo Image - Default field. After you upload your image and save the options, you should have a visible logo in your header area.
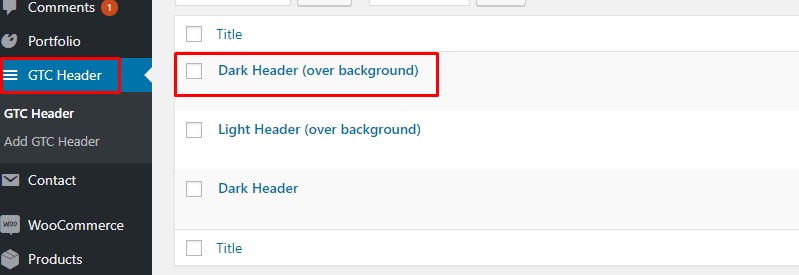
Or you can use GTC Header Builder
1) 2)
2) 3)
3)
-
Header
- Header Style: This option set header prefer style. GTC Header Builder or Standard simple header
- Logo Image - Default: Choose a default logo image to display
- Height: Set header site height
- Background: Set header background color
- Color: Set header text color
- Menu Hover Color: Set menu hover text color
- Sub Menu Background-color: Set menu background-color
- Sub Menu Color: Set menu text color
- Sub Menu Hover Color: Set sub menu hover text color
- Header in grid: Set header content to be in grid
- Header over: Set header content to be over the slider or page title image
-
Sticky ON: Set header content to be over the slider or page title image
- Scroll Amount for Sticky: Enter scroll amount for Sticky Menu to appear (px)
- Hide Sticky Header when scrolling down:
- Sticky Header Logo Image: Choose a sticky header logo image to display
- Sticky Header Height: Set sticky header height in px
- Sticky Header Background color: Set sticky header background color
- Sticky Header Menu Color: Set sticky header menu text color
- Sticky Header Menu Hover Color: Set sticky header menu hover text color
- Header in grid: Set header content to be in grid
-
Page Title
- Show Page Title: Enabling this option will show Page Title area
- Enable Breadcrumbs: Enabling this option will show Breadcrumbs
- Vertical Alignment: Choose Vertical alignment of Page Title
- Horizontal Alignment: Choose Horizontal alignment of Page Title
- Background Color: Choose a background color for Page Title
- Background Image: Choose a background image for Page Title
- Enable Background Image in Parallax: Enabling this option will show background in parallax
- Height: Set page title height
-
Footer
- Footer in grid: Enabling this option will place Footer content in grid
- Show Footer Top level: Enabling this option will show Footer Top area
- Footer Top Level Columns: Choose number of columns for Footer Top Level area
- Footer Top Level Columns Sizes: Choose size of columns for Footer Top Level area
- Footer Top Level Columns Alignment: Choose alignment of columns for Footer Top Level area
- Show Footer Bottom level: Enabling this option will show Footer Bottom area
- Footer Bottom Level Columns: Choose number of columns for Footer Bottom Level area
- Footer Bottom Level Columns Alignment: Choose alignment of columns for Footer Bottom Level area
-
Preloader
- Preloader: Enabling this option will Turn On Preloader
- Preloader Background: Set Preloader background color
- Preloader Circle Color: Set Preloader circle color
- Image in Circle: Choose image to display in circle
Styling Options
-
Color
- Theme Color
- Component Color
- Footer Background Color
- Footer Text Color
- Bottom Footer Background Color
- Bottom Footer Text Color
-
Layout
- Boxed Layout: This option eneble Boxed Layout
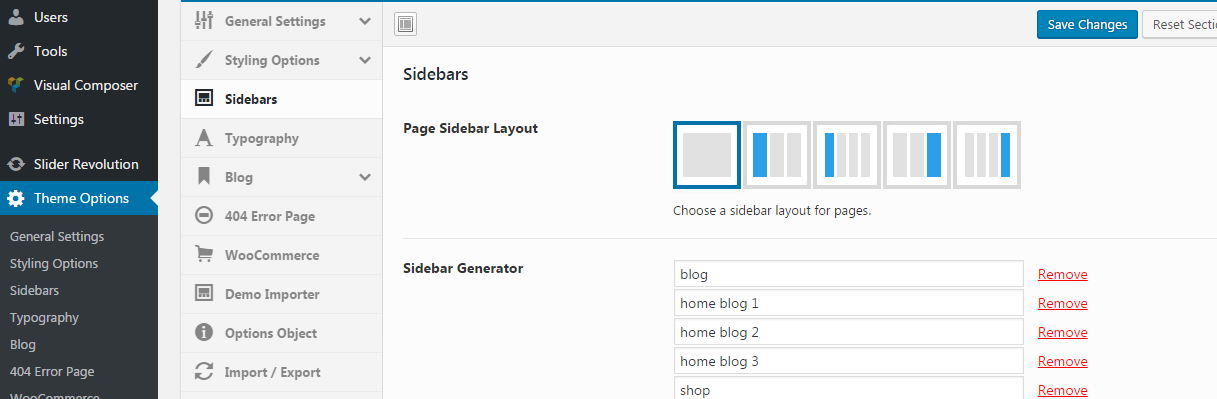
Sidebars
-
Sidebars
- Page Sidebar Layout: Choose a sidebar layout for pages.
- Sidebar: Choose sidebar
- Sidebar Generator
Typography
-
Typography
- Menu Font You can change font options
- Body Text Font You can change font options
- Headers Font You can change font options
- H1 You can change font options
- H2 You can change font options
- H3 You can change font options
- H4 You can change font options
- H5 You can change font options
- H6 You can change font options
Blog
-
Blog
- Blog Single Title
- Type: You can change Blog Layout
- Number of Columns: You can set blog columns (if type - grid)
- Show blog in box: Make blog item in box
- Change Text Length: You can change blog item text length
- Text Length (in words): Set text length (if change text length is on)
- Title Tag: You can choose blog item title tag
- Info Position: You can change position of info list
- Show Date info
- Show Author info
- Show Categories info
- Show Tags info
- Show Comments info
-
Blog Sidebars
- Blog List Sidebar Layout: This option set default sidebar layout of Blog list.
- Sidebar: Choose Blog list sidebar
- Blog Single Sidebar Layout: This option set default sidebar layout of Blog single.
- Sidebar: Choose Blog Single sidebar
404 Error Page
-
404 Error Page
- Title Enter title for 404 page
- Text Enter Text for 404 page
- Back to Home Button Enter text for "Back to Home" button
Blog Posts
To create a new blog post, go to Posts > Add New on the admin panel.
- Enter a title for your post in the text field near the top.
-
Next, on the right side of your screen, there is a section called Format, please choose a format for your blog post. Now, let's go over the available options:
- Standard: This is the default blog format. You can start adding content with the Visual Editor.
- Gallery: When you select this format, an image slider will be created on top of the page. All images of this slider must be added to the field "Gallery Images" in box "GTC Post Format Option"
- Link: When you select this format, the post special media container will be linked to the URL you input in the fields "Link, Text Link" in the box "GTC Post Format Option"
- Quote: This format will make the post is presented as a quote You can set quote in the fields "Quote Content, Quote Author" in the box "GTC Post Format Option"
- Video: When you select this format, a video player will be created on top of the page. The video URL must be added to the fields "Select video type, oEmbed, Self Hosted" in box "GTC Post Format Option"
- Audio: When you select this format, an audio player will be created on top of the page. The audio URL must be added to the fields "Select audio type, oEmbed, Self Hosted" in box "GTC Post Format Option"
Now it's time to categorize this post.
- Under Format section, there is a section called Categories, select the category that you want to assign to this post. Morover, if you'd like to create a new category, click on "+ Add New Category" A text field will unfold where you can enter a name for the category.
- Then click on "Add New Category".
- Once selected the category you want, click the "Publish button".
- Under the Categories section are the Tags and Featured Image sections. Here you can add some tags to your post, and upload an image that will be displayed as the Featured Image (the representative image) of the post in the blog list pages.
Now, you've finished the setting for your blog post.
Pages Management
Creating your own page has been never so easy. To make the first step please go to Pages > Add new. At first sight, everything looks just like in default WordPress. But when you look at Visual/HTML area you will see some Page options or on Page Attribute panel, you will see some Page templates that we will explain below.
Page Templates
When creating a new page, one of the first things you might want to do is to assign a suitable template for it. To do this, please find the Page Attributes section on the right of the page editor. It comes with a variety of templates to choose:
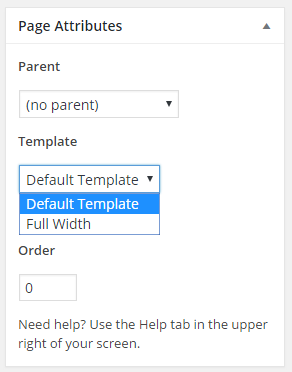
- Default Template: Choose this one if you want to create a standard page
- Full Width: Choose this one if you want to create a page with Full width Layout
Page Options
Beside the variety page templates, we offer a number of options to customize each page easily such as: sidebar position, page title, page header background, breadcrumb options. These options will override the global options of the theme in Theme Options settings.
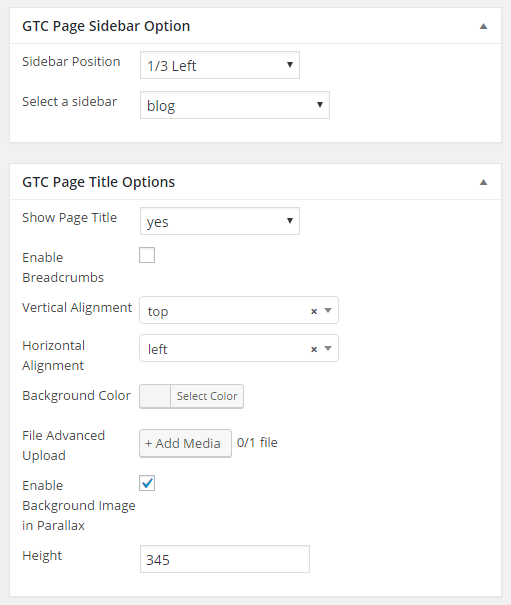
- SideBar: When enable this option, you can override the Sidebar settings
- Page Title: When enable this option, you can override the page title settings
- Breadcrumbs: Select the Breadcrumb state (enable/disable)
Shortcodes
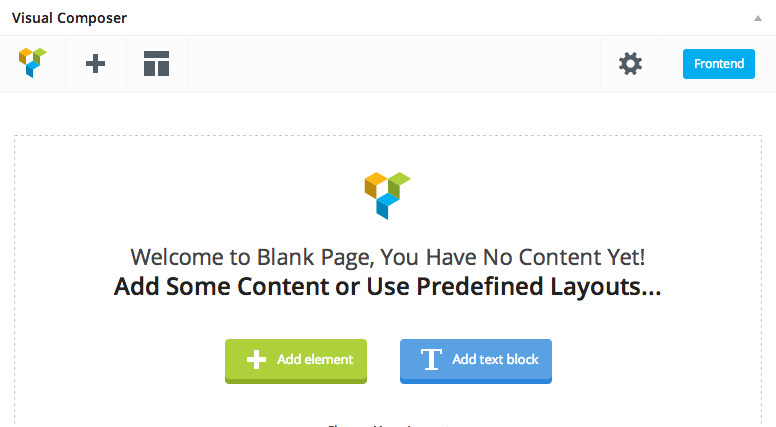
Castor is built with several custom shortcodes that will make life easier when creating content. To use these custom shortcodes, just open the visual composer and add the elements you need to use.
Widgets Management
This theme support 10 widgets areas listed below:
- Footer Top Column widget #1 to #4: This areas will be used to display widgets in Top part of Footer
- Footer Bottom Column widget #1 to #4: This areas will be used to display widgets in Bottom part of Footer
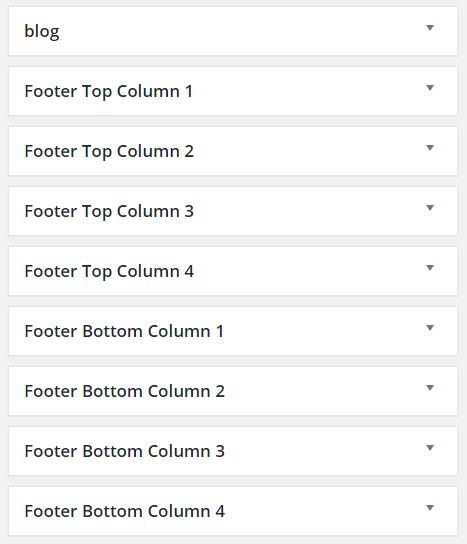
Beside the built-in sidebar areas, we provide a feature called "Custom Sidebar". With this feature, you can create unlimited sidebar areas. To create a custom sidebar, just navigate to Theme Options > Sidebars you will see the box "Sidebar Generator. Please enter the sidebar title as you want and click to "Add more" button, a custom sidebar will be created.
To remove a custom sidebar, in Theme Options > Sidebars please open the sidebar that you want to remove. Click button "remove"
Credits
Photos: The images used on the demo site are for demonstration purposes only and are not included in the download file.
Icons Font- Font-Awesome (http://fontawesome.io/)
Support
If you have any questions, feel free to contact us at support@gtcreators.com.
© Castor 2019